Tuesday, May 9, 2023

Done! - Project 32x60, the Evans and Zeiglerville RR (The E-Z Route 😉 )

(See the April 8th blog entry for the beginning of this project.)

This project was dedicated to the mentors from my early model railroading days: Ed Evans and Wayne Zeigler. My first 8’x12’ HO layout was built using lumber from Mr. Zeigler’s old house fence.

Ed Evans was my Westville Methodist Church Sunday School teacher. His lessons and guidance  ranged far beyond model railroading. He did made the mistake of bringing an old Athearn rubber-band powered, 5 stripe, Pennsy RR diesel to Sunday School class one day whereupon he was hounded (mostly by me) to start a model railroad club in the Church basement. He would also take us on tours to visit other model railroads in the area and launched us (or at least me) into the wonderful world of model railroading. (That was the beginning of the HO Gateway Model Railroad Club which still exists today in Brooklawn, NJ.)

So, paying it forward, to these 2 gentlemen this display layout is dedicated.

I should copyright this track plan since I’ve been using variations of it for 50 years since I first sketched it out on 6,000 mostly discarded sheets of paper. A 4’x8’ version of it was featured in the Sept/Oct 2012 issue of N Scale Magazine (tongue in cheek: “The “Perfect” 4’x8’ Trackplan”). It was also used in the layouts I built for each of my adult children’s Christmas layouts. (They used Atlas Snap & Flex track and fit on 27”x48” frames.)

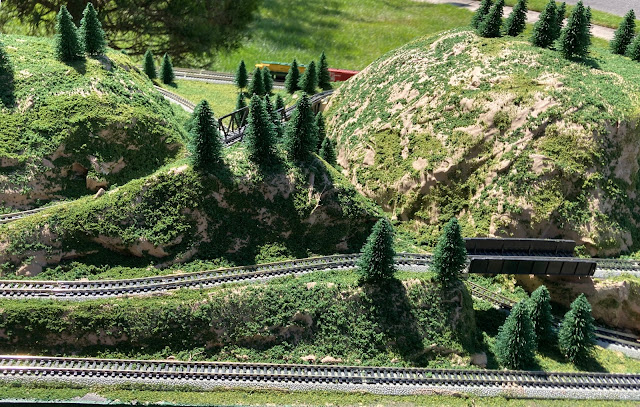
Since I had a pile of unused Bachmann E-Z track laying around I decided to use it for the E-Z RR display. I could only squeeze it onto a 32x60 frame. I used 1x2 wood and 7/16 plywood to cut down the weight and removed unneeded portions in the cookie-cutter approach. Glued cardboard strips supported shopping bags and Hydrocal soaked paper towels formed the hills. Woodland Scenics materials and evemodel_usa fir trees added the finishing touches.

It is wired to run 2 DC trains in opposite directions on the 2 independent track segments using a single DC power pack. I imagine you could squeeze in a short 3rd train with DCC attention.


Ed Evans on a Sunday School "Field Trip" in 1959
The center mild edge curve was left out


Thursday, April 20, 2023

Done! (at least my part of the T-Trak module)

I have turned my T-Trak project over to my club's (New Jersey Southern) possession. I have taken it as far as my color-blindness and T-Trak inexperience can take it. The club has people with more skills than I possess to take it to the next level.

I think the initial electrical test showed some incorrectness in the wiring. They can replace the trees, color the rockfaces, upgrade the stream, and harden it for the abuse it will receive in transport.

I always wanted to try a T-Trak module and also be able to harass an old friend, the "Ol'Curmudgeon". Paul (S) started the Realistic Model Railroad forum and banned Kato UniTrack as "unrealistic". Believe me when I say I personally do NOT like UniTrack or Bachmann E-Z Track but I do believe it can be made realistic by painting the side rails and burying the ballast sides. Hence my efforts on this T-Trak module.

Having spoken of my disdain for Bachmann E-Z track, you will notice the 32x60 E&Z RR project I have posted is E-Z track. 1) I had a lot of it laying around and 2) this will be a traveling kid's layout for when our club does library displays, etc. and E-Z track holds up against the abuse better than my preferred cork and Atlas flex track.


Saturday, April 8, 2023

Project #2 “32x60”

I’m doing a second project for when the New Jersey Southern model railroad club does small T-Trak and N-Trak setups for kids at libraries and other functions: a very portable small layout capable of running multiple trains in a modest footprint. I’ve done this track layout for each of my grown children’s Christmas layouts. Using Atlas flex and snap track I could fit it into a 27” x 48” footprint.

One of the 27"x48" Christmas layouts

I had a large pile of Bachmann E-Z track (I am NOT a fan of E-Z track or of Kato track!) so I set out to use it. That “grew” the layout to 32” x 60” due to available curve sizes and lack of flex track. Keeping portability (size AND weight) in mind I started with 1x2s and 7/16” plywood (boy has that become expensive!) and utilized a cookie cutter method for track risers and reduced weight (removing the empty centers).

A glue gun, corrugated cardboard strips, and paper shopping bags (now banned in wonderful New Jersey!) created the mountain framework. Hydrocal soaked paper towels are scheduled to follow. Here’s the progress so far.

Sketch out the track plan (from a SCARM sketch) on the 32" x 60" plywood panel

Plywood cut to allow grades (and eliminate some plywood weight)


Track with risers in place

All but one area of glued corrugated cardboard strips covered with brown shopping bags.

Video of test run before scenery is to be added

T-Trak Module Progress 4/8/23

Have a ways to go, but making progress on the T-Track module. Mixed Sculptamold, "Dry Dirt" paint, and water, sealed the seams in the Styrofoam layers, painted the whole thing, and added coal to the coal mine area. I'll use an Atlas suburban station and a 1960's/70s AHM coal mine kit based on a scratch built mine by Jack Work, published in a 1950s/60s Model Railroad magazine article.

Curious to see how it was working out I added some turf and untreated puffball trees. This will become a New Jersey Southern model railroad club project. I will turn over, permanent tree installation, rockface painting, and stream building to other more talented club members and we should end up with an attractive T-Trak module (to be titled the "Lyedrick Mine Junction" [Lee-ed-rick]).


Wednesday, February 15, 2023

T-Trak

 I joined the New Jersey Southern Model Railroad group last year. They have N-Trak, T-Trak and I think some free-mo modules. I haven't built anything in a while, so I figured I would participate by building a T-Trak module.

T-Trak modules usually come in 1', 2', 3', and 4' modules. One footers are a way to especially get younger modelers involved. Easy start-up and the opportunity to finely detail a small module. One of the club's senior members makes some of the bases and gives them to the younger 4-H club members to get them started in the hobby. (Kudos to John Kern!)

Not one to be content starting with a 2 track one foot module I figured I would do a 3 foot multi-level module. So here it begins:


More paint, Sculptamold, and let the scenery begin!